The Great Thunderblade: An Elemental Masterpiece#
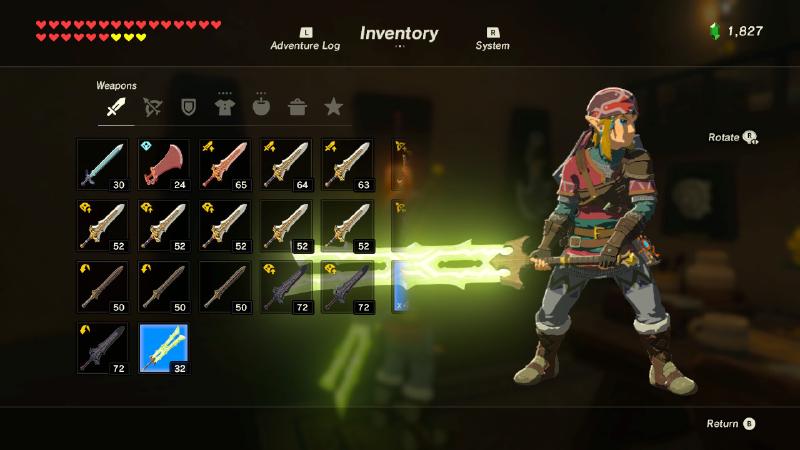
In The Legend of Zelda: Breath of the Wild, the Great Thunderblade is one of the most visually striking weapons in Link's potential arsenal. It belongs to a family of elemental greatswords, alongside the Great Frostblade and Great Flameblade, each infused with different elemental properties.
What makes the Great Thunderblade special is its ability to discharge electricity when striking enemies, particularly during thunderstorms when the blade glows with increased power. This unique lighting effect in the game inspired me to incorporate actual LED lighting into my replica, taking my cardboard weapon crafting to an entirely new level.
At over 1.5 metres in length, this is the largest sword I've created to date, making it a true two-handed greatsword just like in the game. The project takes things to the next level compared to the previous projects in Swords-n-Stuff incorporating laser cutting, 3D printing, and electronics for the first time. It was a fun extension and lots of learning areas.
Building the Blade#
For previous projects like the Master Sword and Royal Claymore , I'd hand-cut all the cardboard pieces. After several projects of painstakingly multiple layers of cardboard, I was done with all of that... time to bring in the big guns and some technology!
Starting with a Template#
I started with my usual approach of creating an outline template in Adobe Illustrator. I did go ahead and create a paper template to create the centre blade layer.
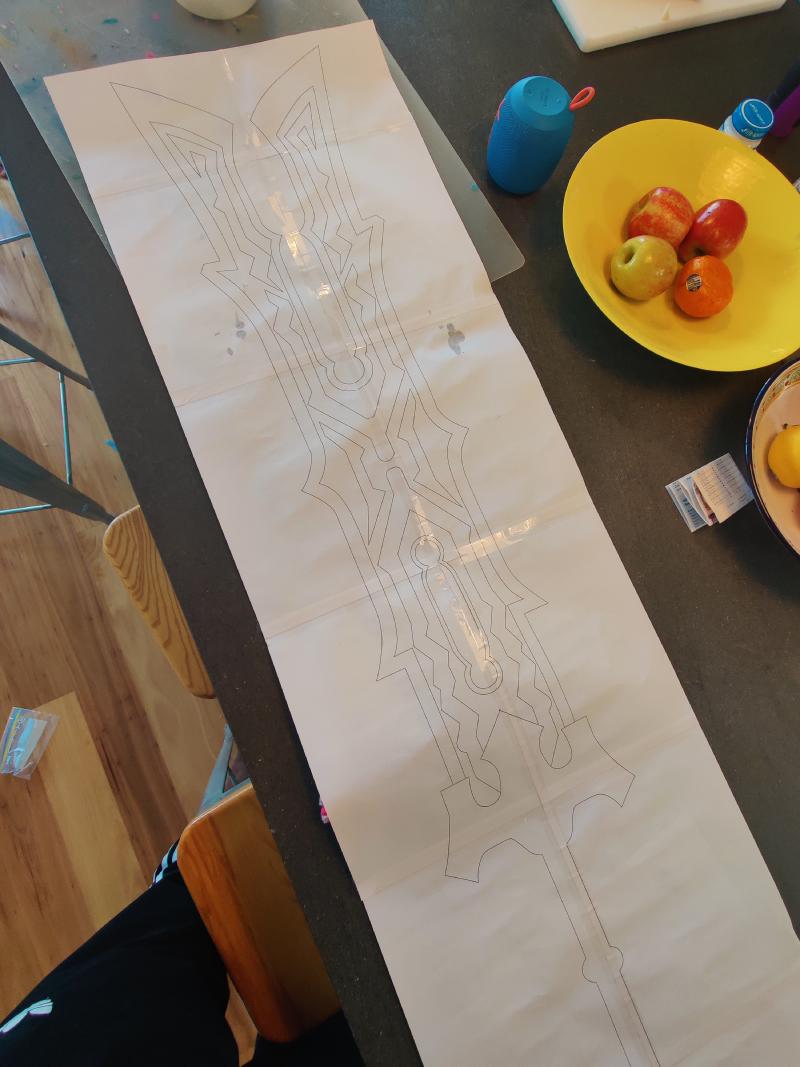
The laser cutting wasn't FREE like recycled IKEA packaging, so rather than produce multiple sheets of cardboard via the laser, I still used the paper template and recycled cardboard for the centre of the blade. While this was still some manual work, it wasn't the more detailed work that was going to be needed for this design, so was still achievable.
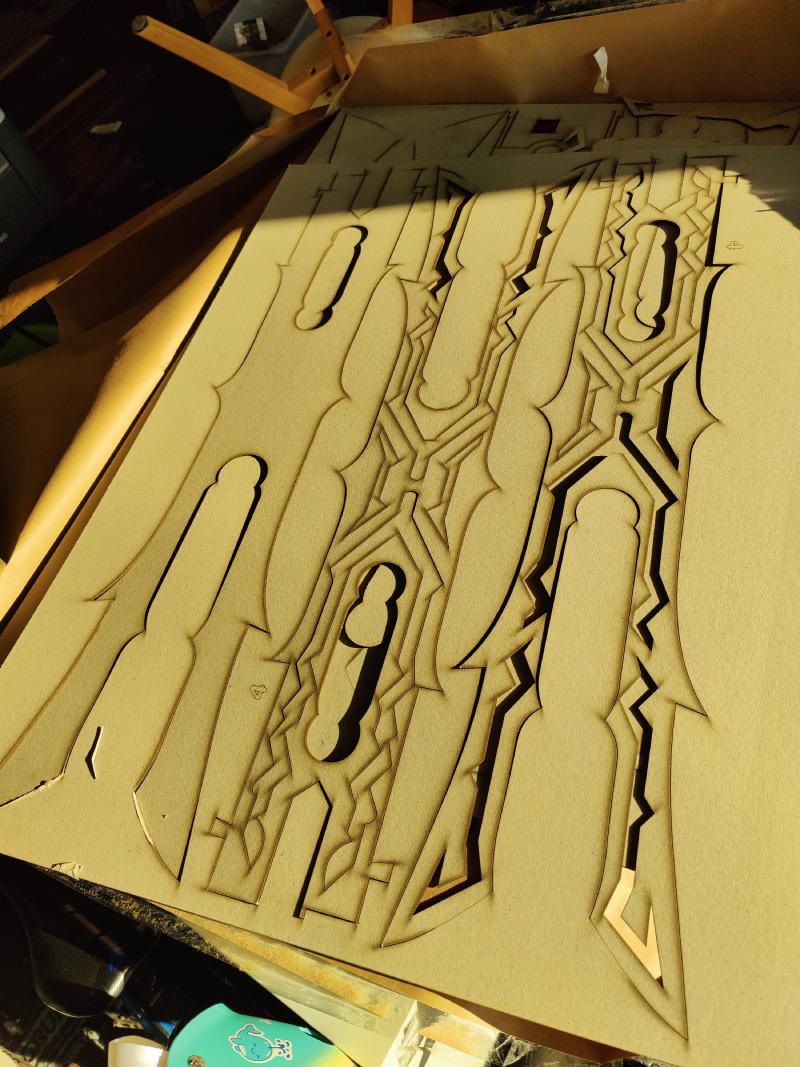
From Digital Design to Laser Cutting#
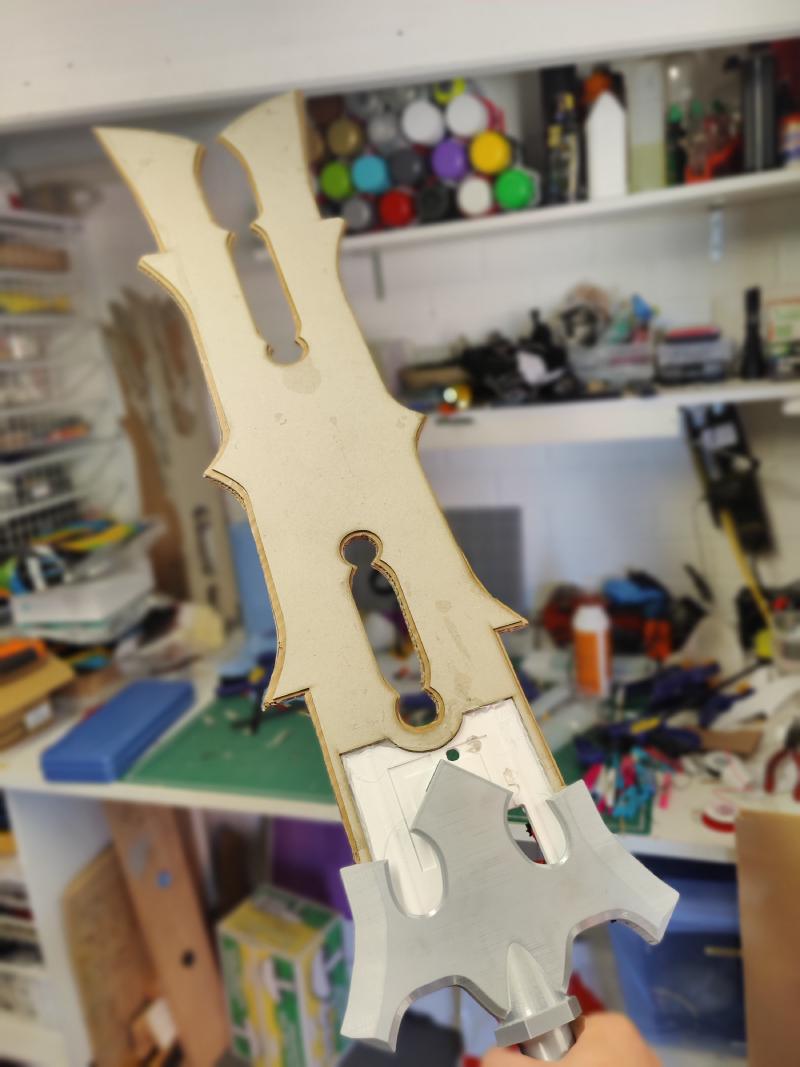
The distinctive lightning bolt pattern along the top layers of the blade were going to be incredibly tedious to cut by hand and impossible to get the level of accuracy needed for the integration of the 3D modelled elements.
So, I found a local laser cutting workshop (Make Workshop ) who was able to take my especially prepared Illustrator file to precisely cut the required layers from cardboard sheets. The results were far more accurate than I could have achieved manually, with perfectly clean cuts even in the detailed lightning pattern areas. These also matched the 3D printed elements perfectly which was a big change from the inperfection of the hand-cut approach I was using previously.
Layering and Assembly#
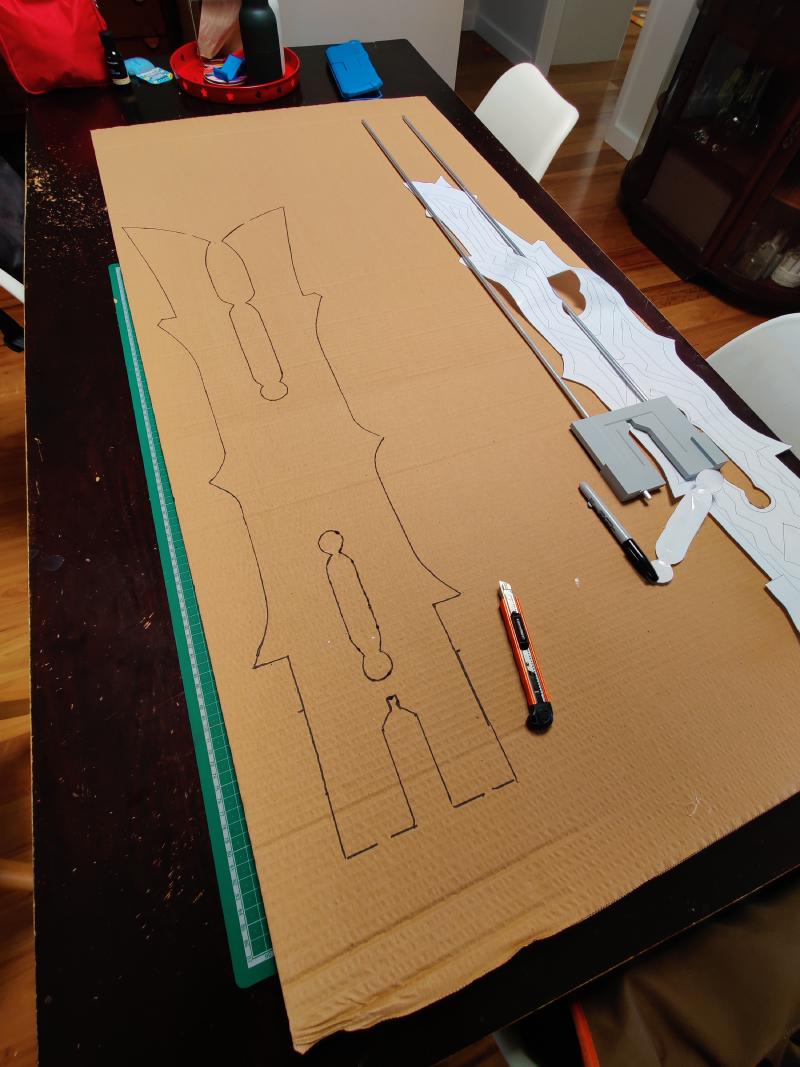
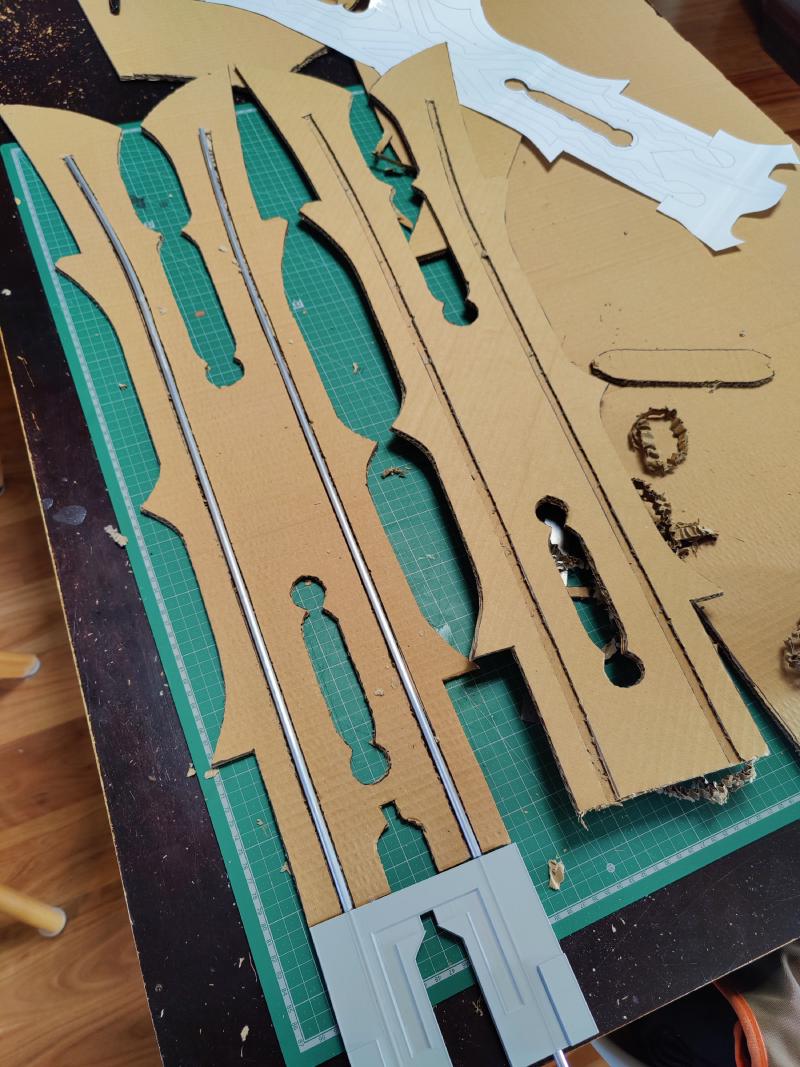
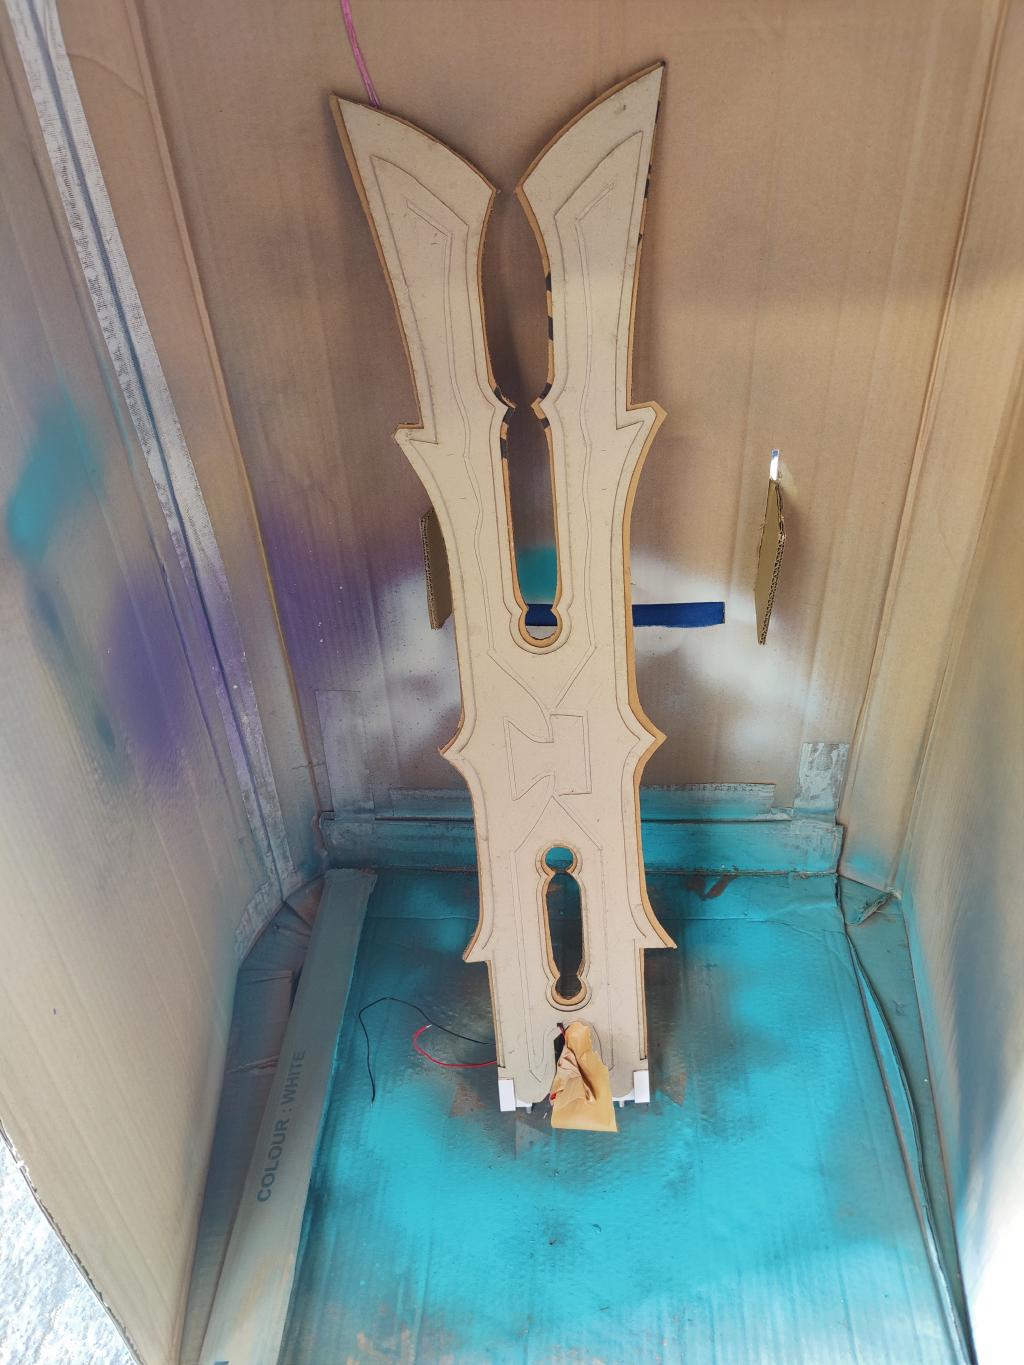
As with my previous swords, I built up the blade using multiple layers of cardboard for strength, five in total for this build. The difference this time was the precision of the pieces, which aligned perfectly thanks to the laser cutting. This precision became particularly important when planning for the LED installation, as I needed to create specific channels for the wiring.
I made a bit of an error with the laser cut board though, opting for a quite dense board option rather than corrugated cardboard I used before. This resulted in a substantially heavier final product than my previous swords and while this added weight gives the sword a satisfying heft and sturdiness, it also makes it too heavy my little guy to satisfyingly wave about! So, it looks cool, but playability level for this build wasn't as high as I'd like. If anyone follows in my footsteps here, make sure you know what you're ordering from the laser cut shop!

Lighting and LEDs#
The most ambitious aspect of this project was incorporating LED lighting to recreate the sword's in-game glow effect. This was my first serious attempt at integrating electronics into a prop, and it came with a learning curve.
Planning the LED Installation#
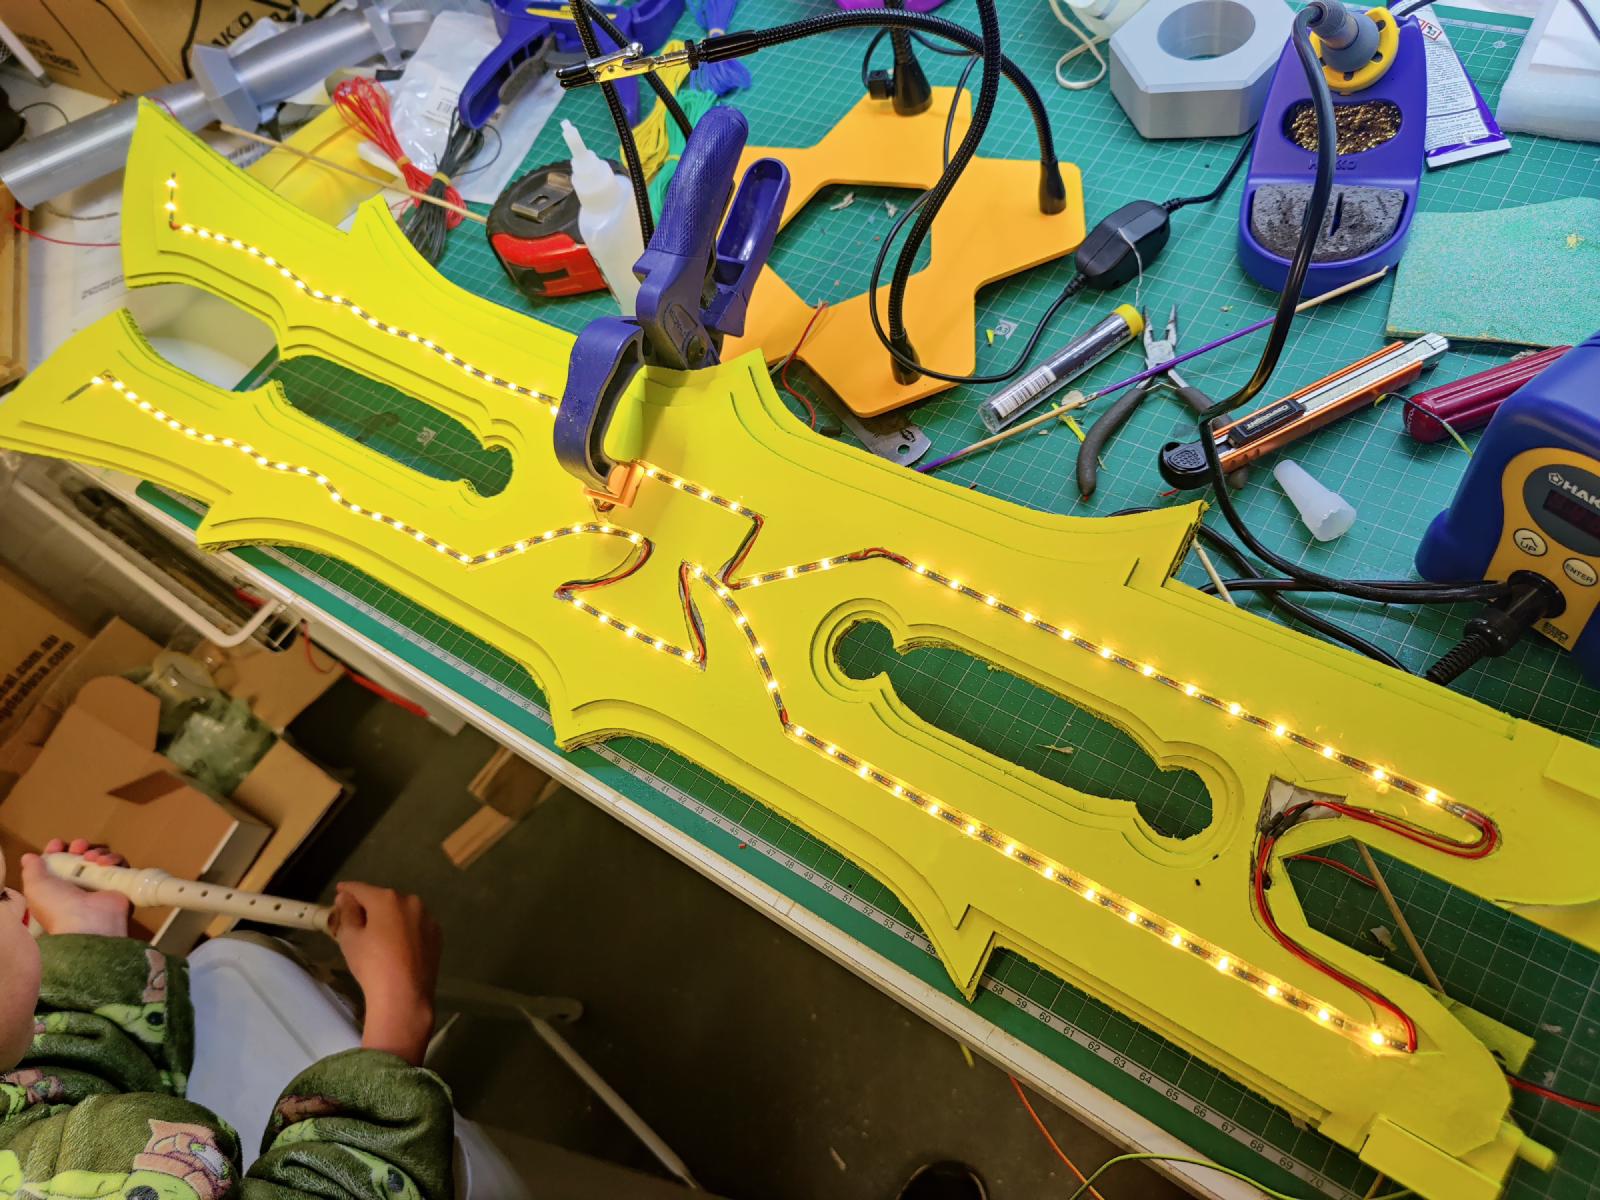
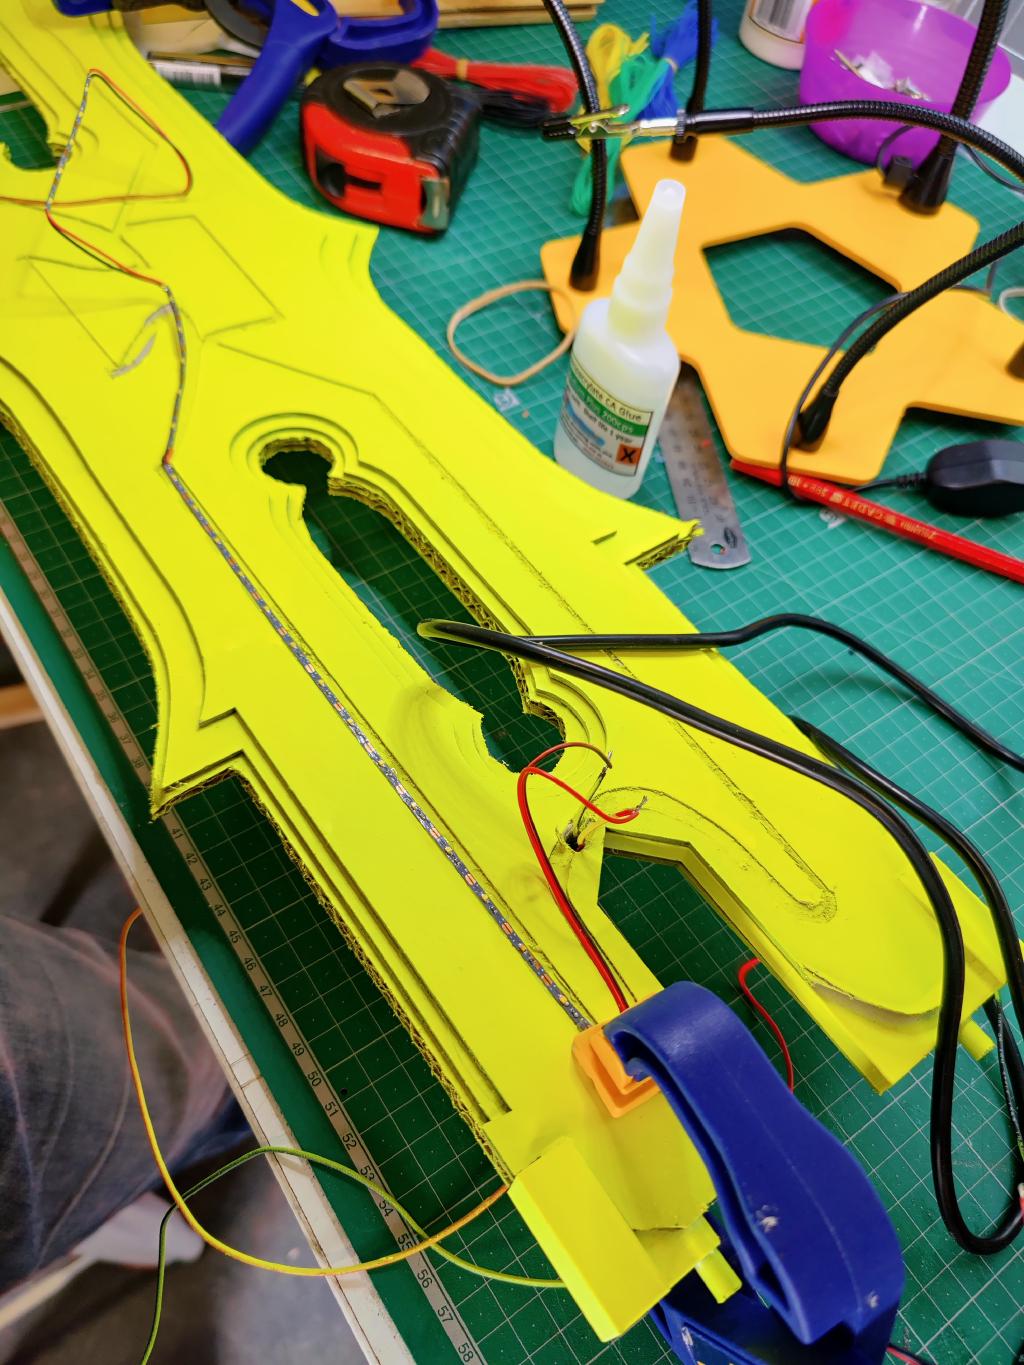
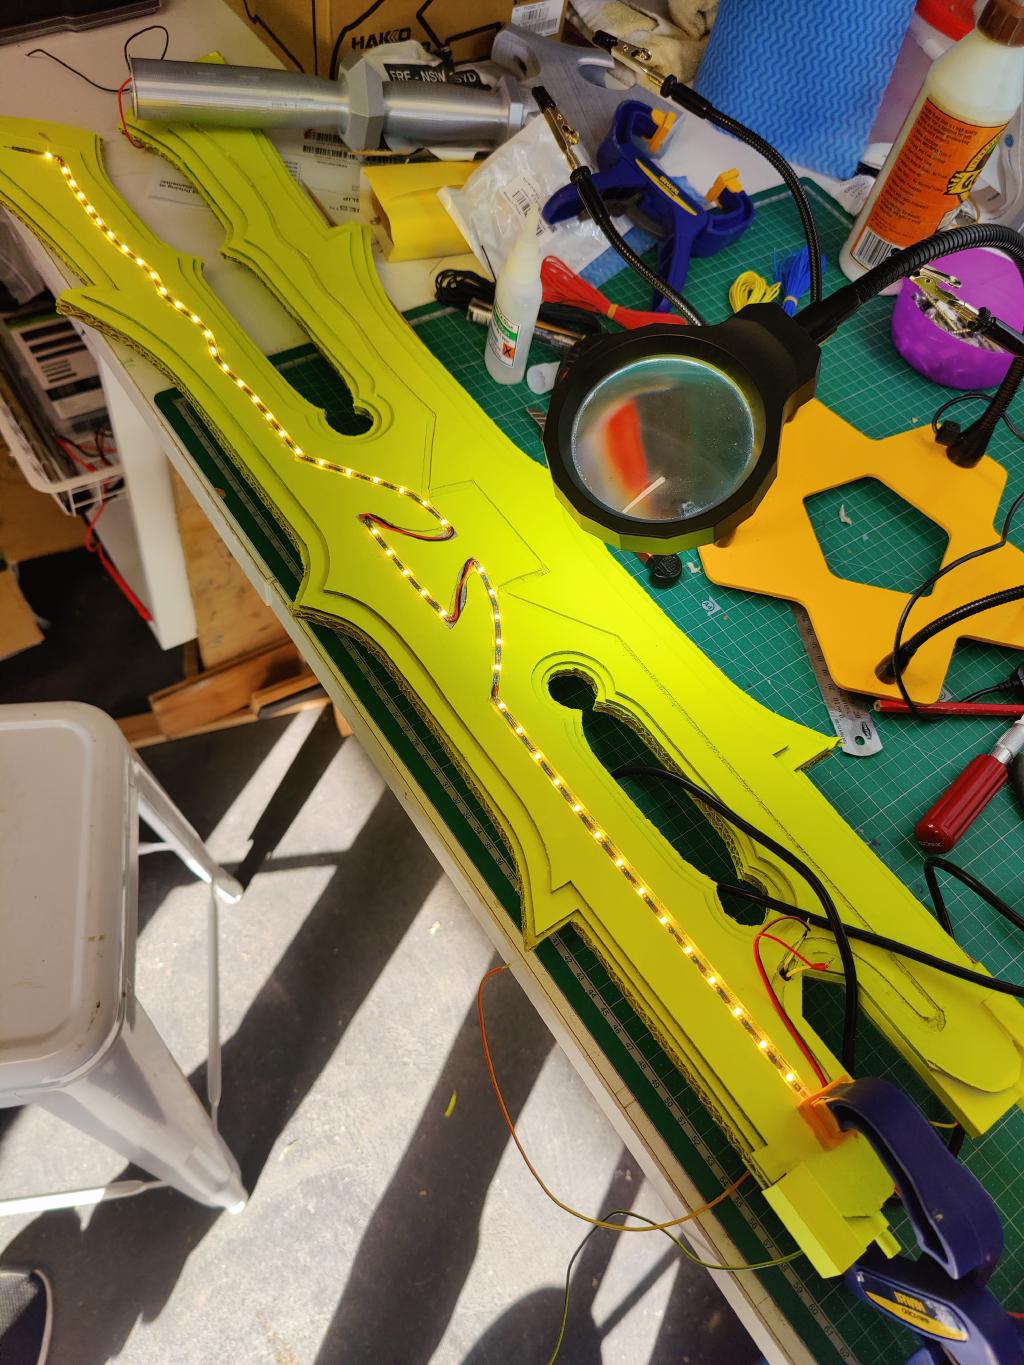
I used approximately 200 small white LEDs on 3mm-wide strips. The exact number isn't critical - what matters is having enough to illuminate the lightning pattern evenly along both sides of the blade.
To accommodate the LED strips, I carved narrow channels into the cardboard layers before final assembly. These channels followed the lightning pattern on both sides of the blade, allowing the light to shine through precisely where needed.
Wiring and Power#
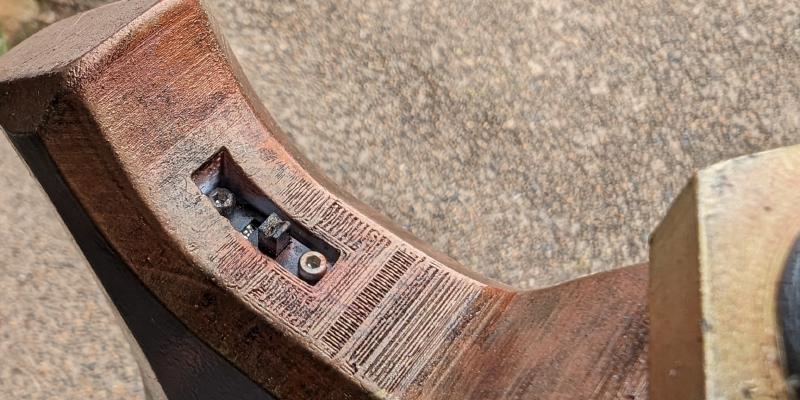
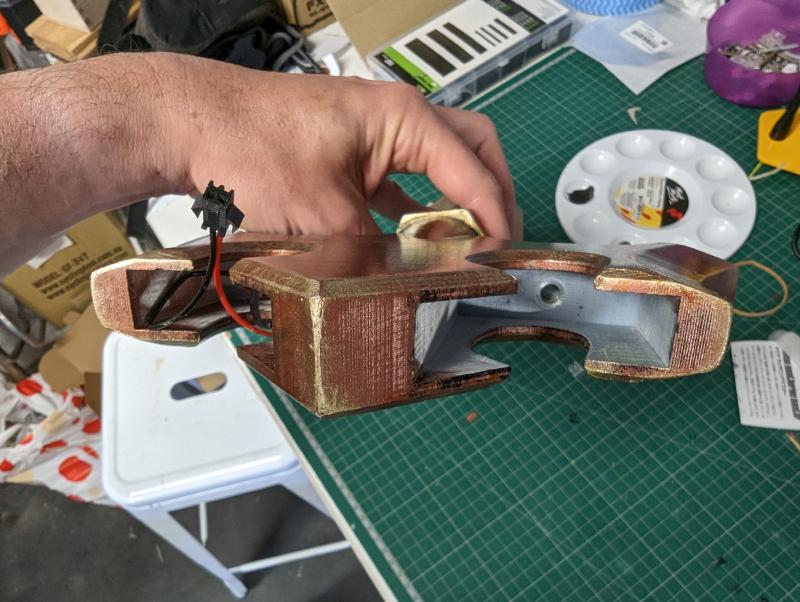
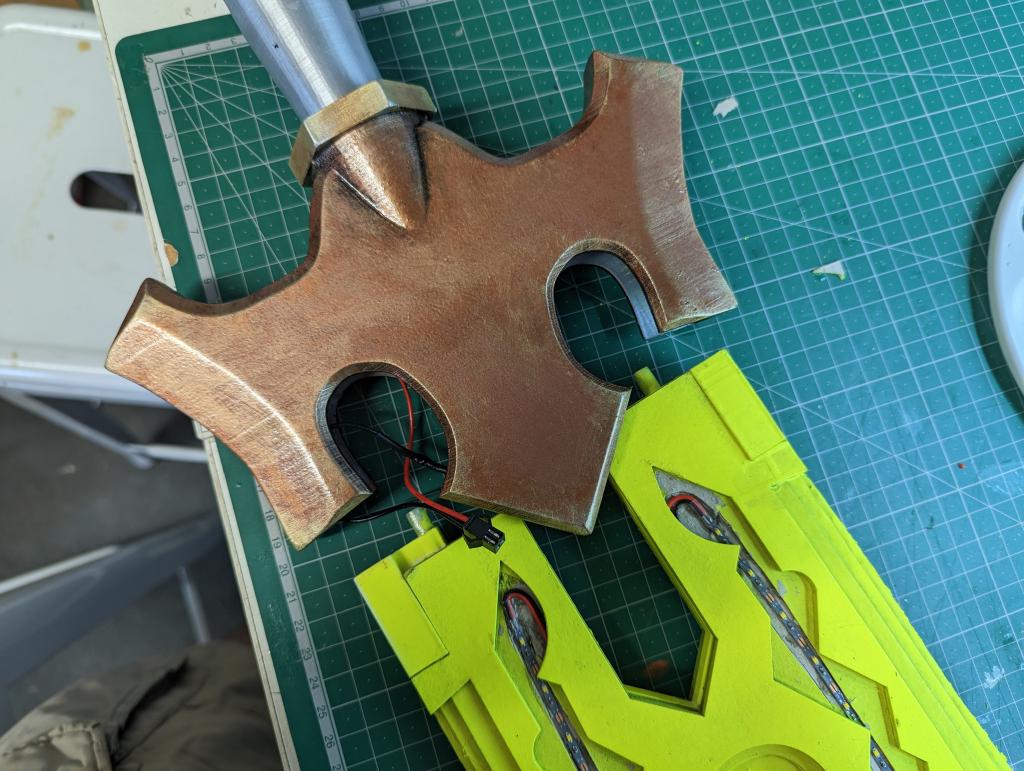
The LED strips connect to a buck converter (voltage regulator) that sits at the bottom of the blade. This converter takes 9V from the battery in the handle and steps it down to the appropriate voltage for the LED strips.
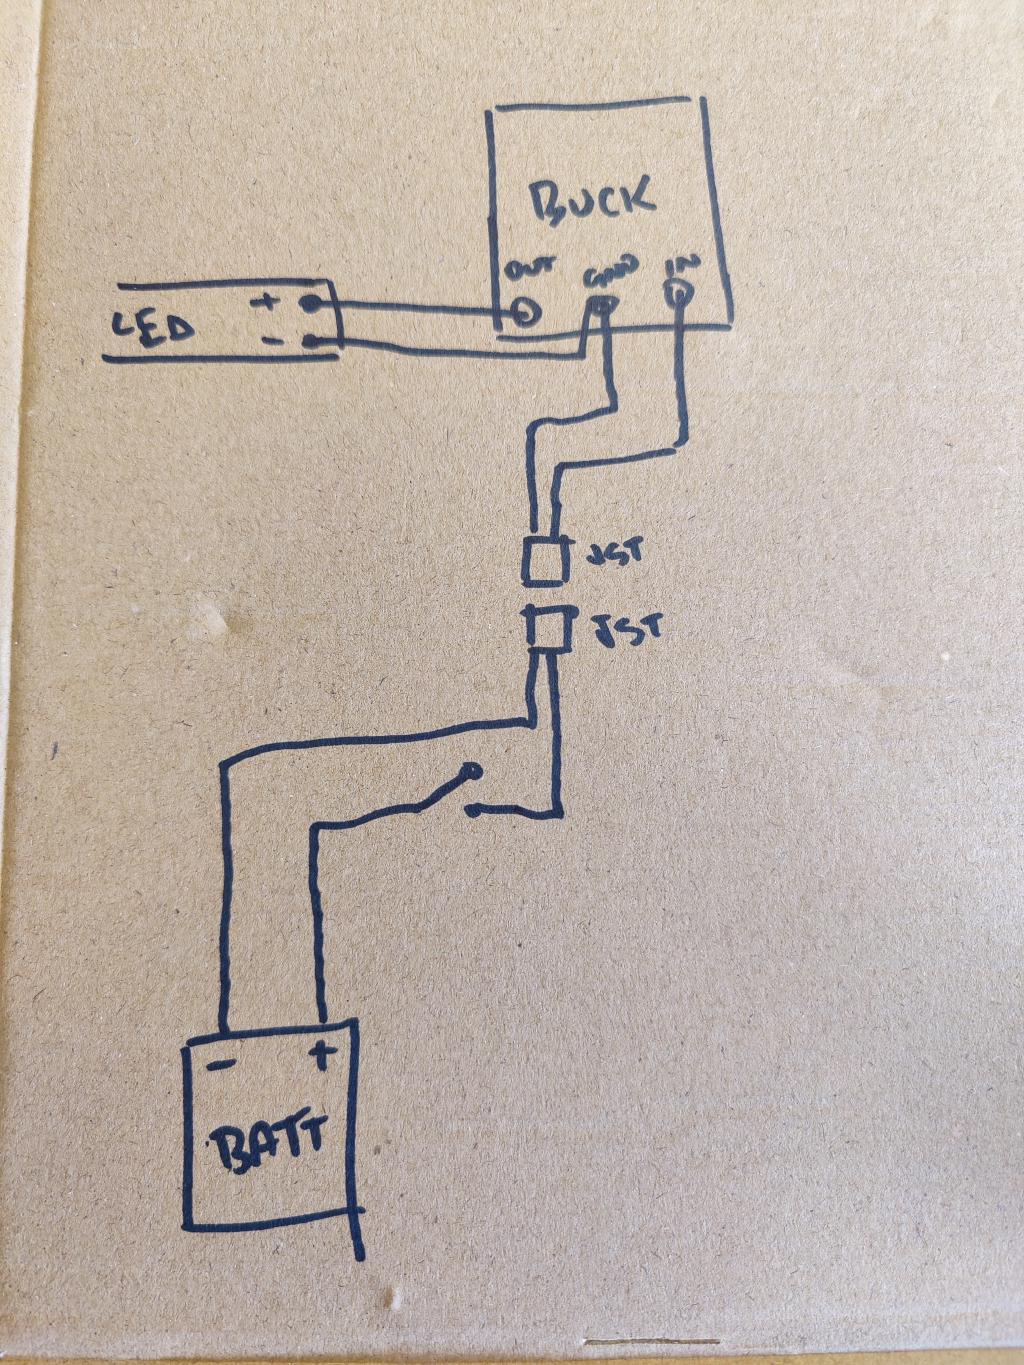
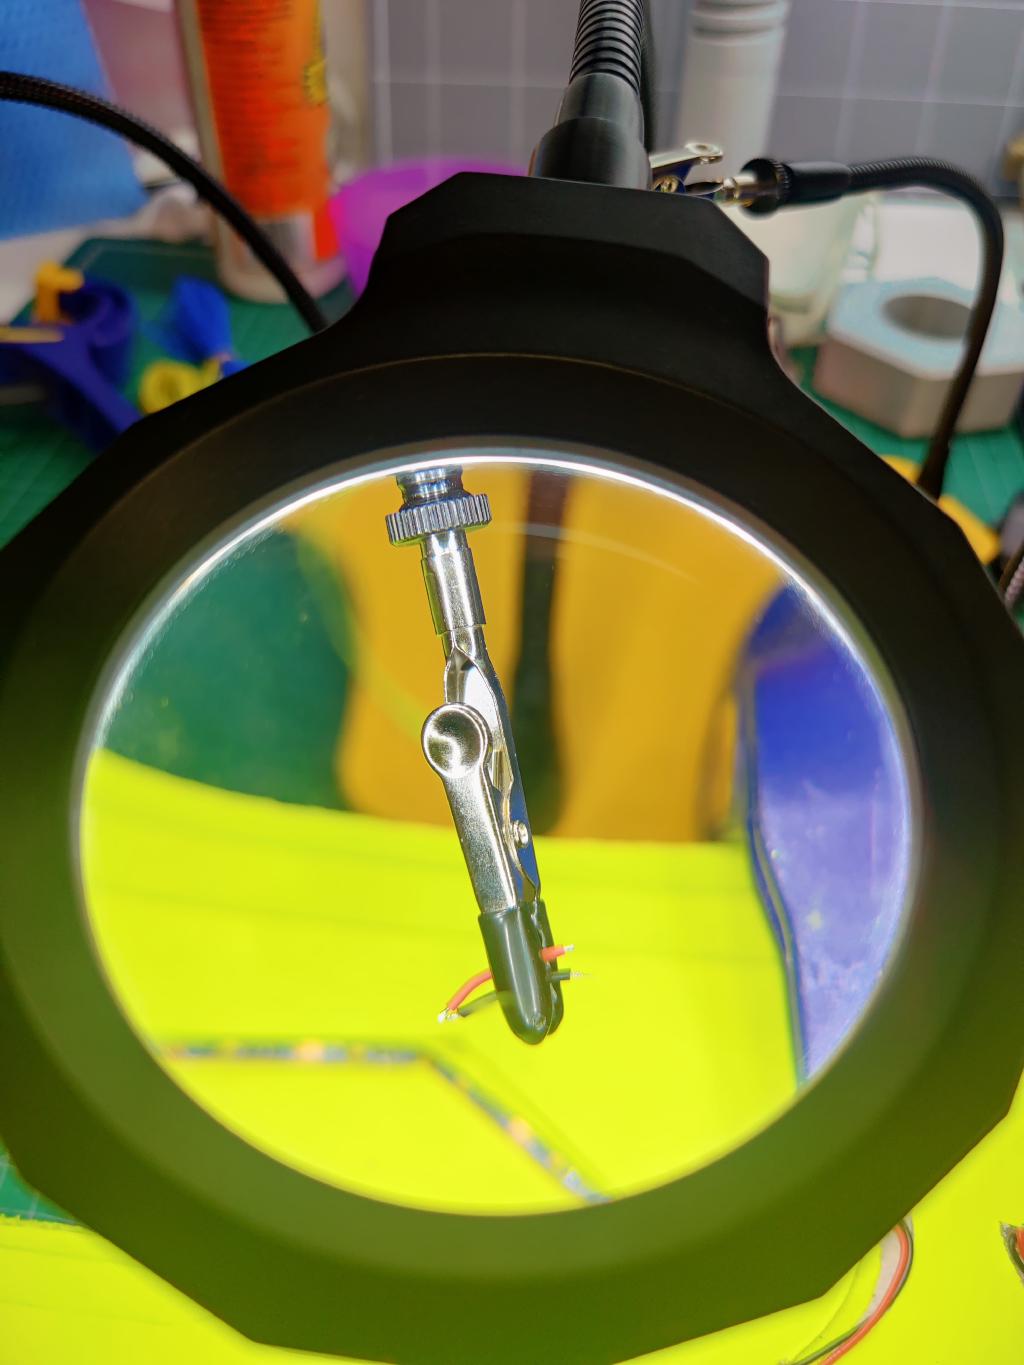
For power, I used a standard 9V battery housed in the handle section. This is wired up the centre of the handle to a JST to connect to the blade when those parts are brought together later.
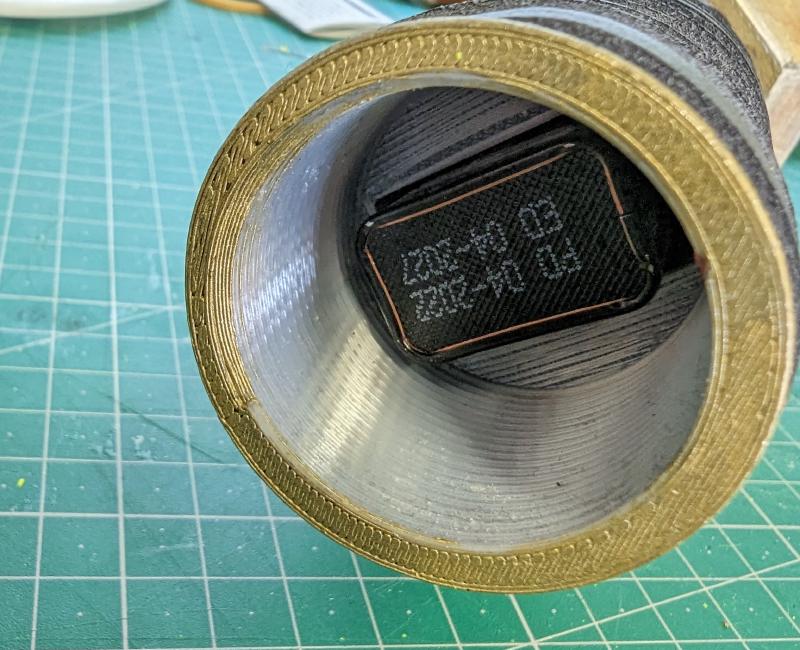
The buck converter is tucked neatly(ish) into a hollow area at the bottom of the blade and a JST connector is used here,so I could build the blade and the handle seperately. A small switch on the underside of the hilt lets you turn the lighting on and off. When switched on, the sword's lightning pattern glows brightly, mimicking its appearance during thunderstorms in the game.
The LED Installation Process#
Installing the LEDs was easily the most tedious part of the entire build.
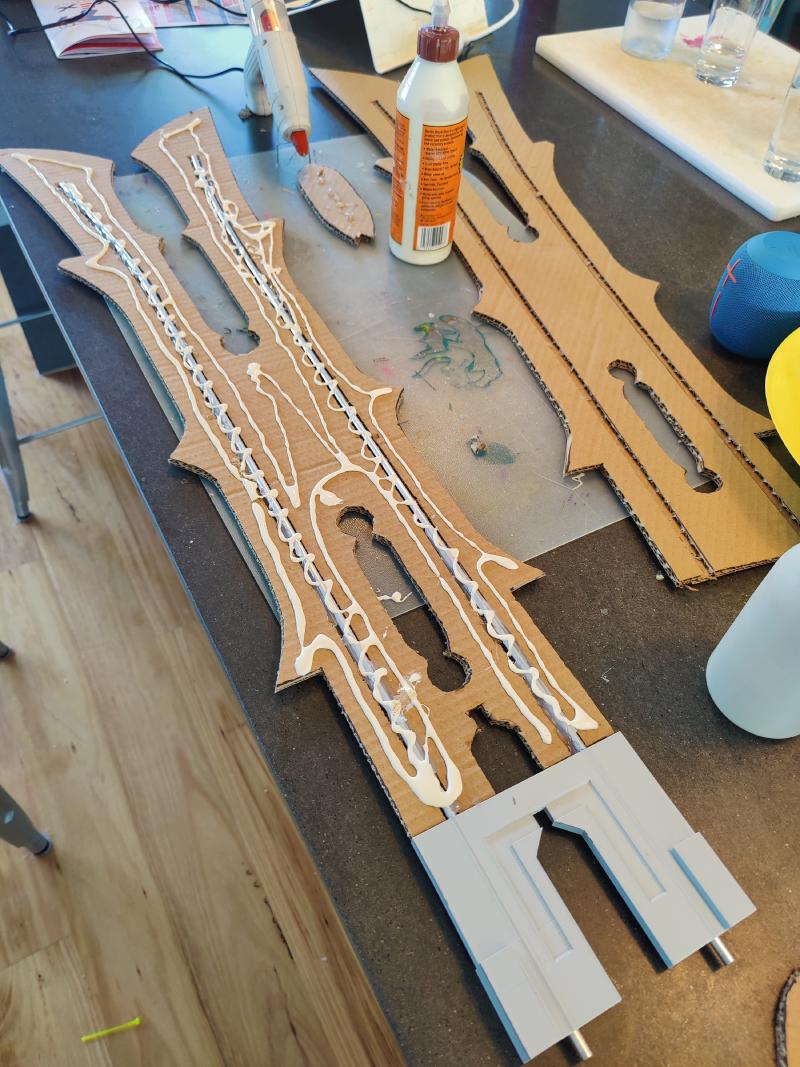
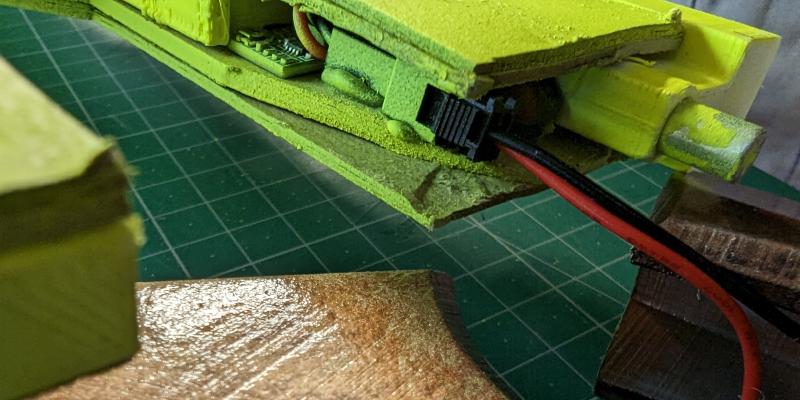
I carefully cut channels in the cardboard layers where the LED strips would sit and set about building the LED strips. With the complex path the LEDs had to cover, they needed to be split into seperate sections and joined together. This required lot of very tiny wired connectors. While to outcome was a good look, the time that went into this part of the build was significant. Avoid if you can :)
Once routed and wired, the LEDs were glued into their cardboard channel with superglue and the final layer of cardboard was layered on top and glued down as well. With the blade obviously having two sides, this needed to be done twice - with wiring routed through the blade at the bottom to then connect to the switch and power source in the handle.

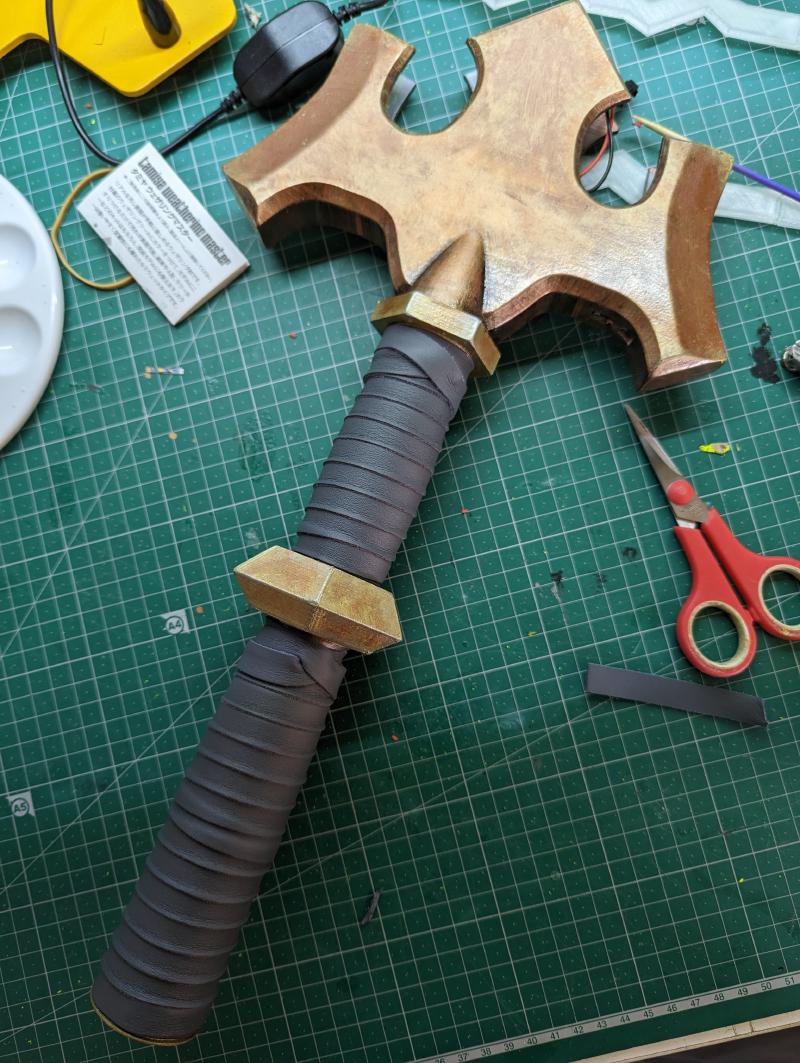
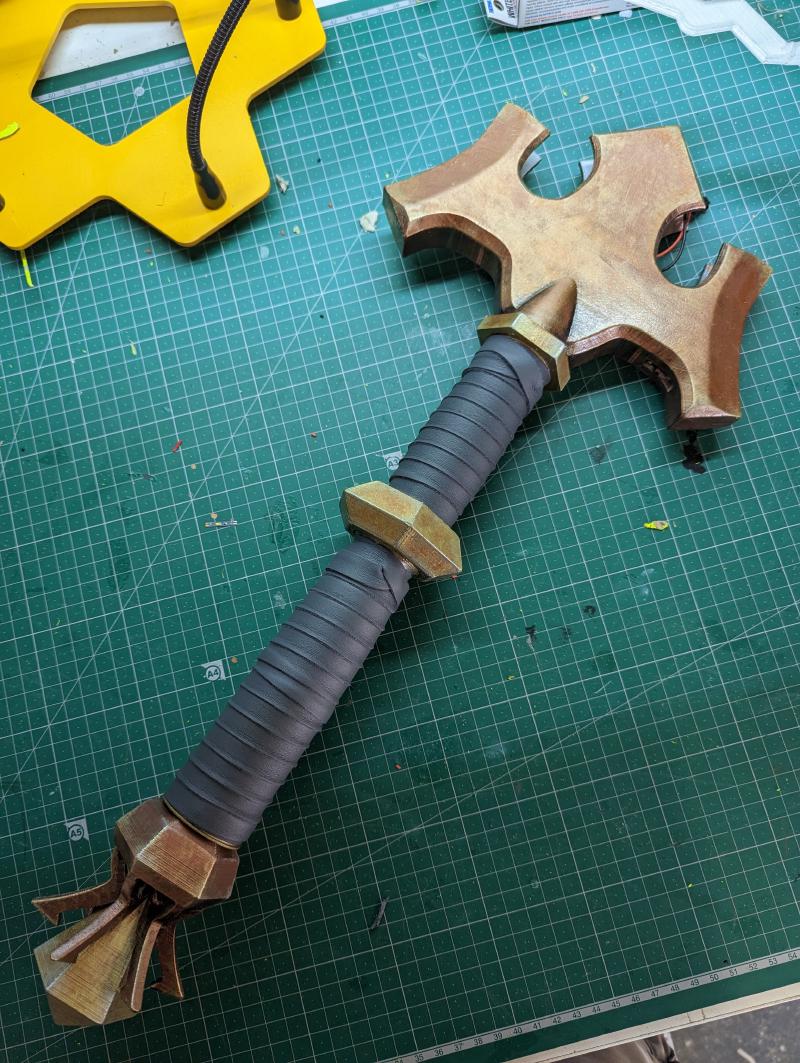
Building the Handle and Hilt#
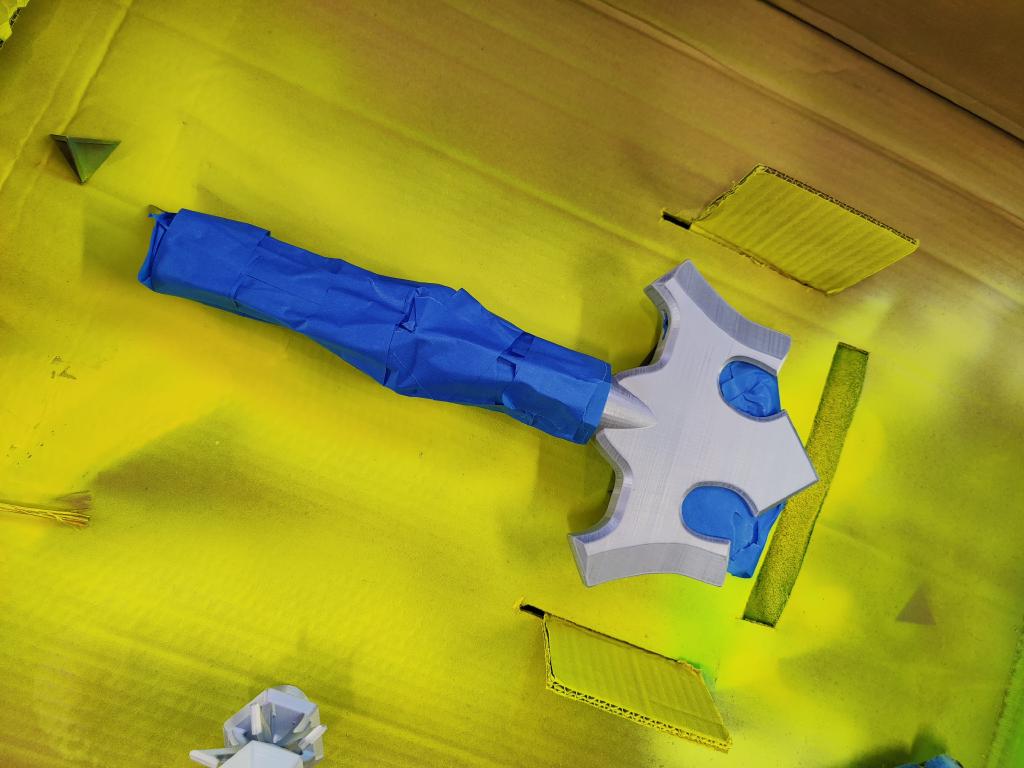
While the blade incorporated laser-cut cardboard, I took a completely different approach for the handle and hilt, embracing 3D printing technology.
3D Design and Printing#

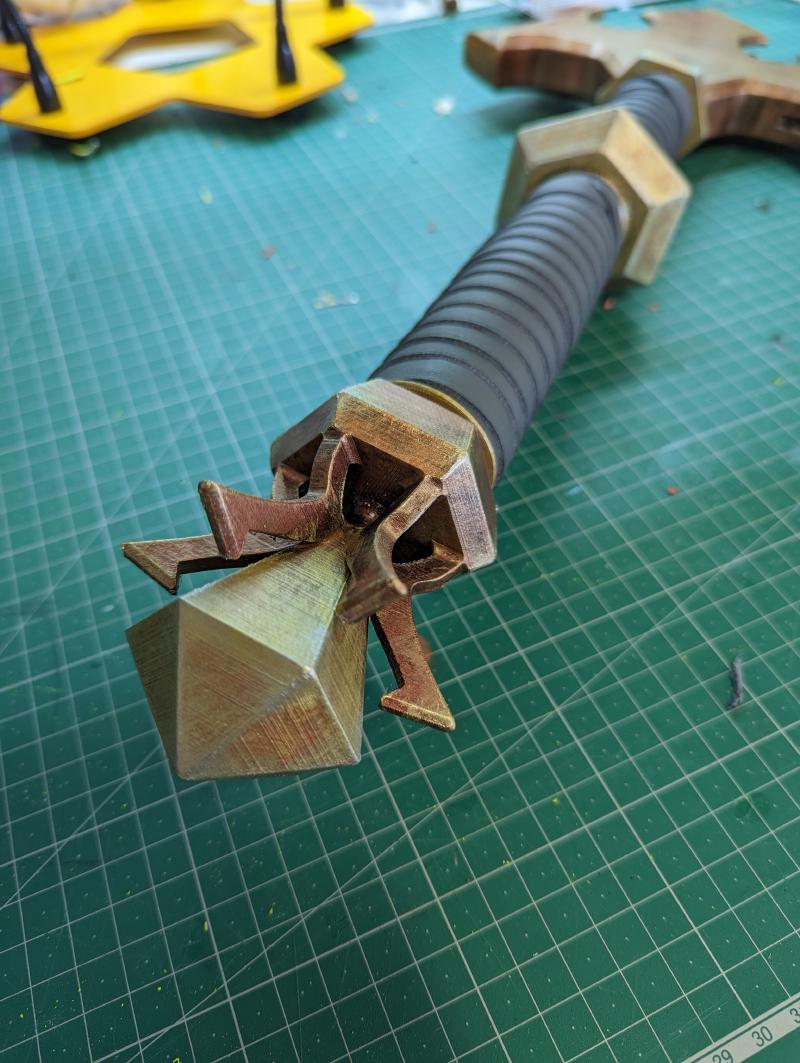
After creating the basic outline in Illustrator, I imported the design into Fusion 360 to model the handle and hilt components in 3D. This allowed for much more detailed shaping than would be possible with layered cardboard.
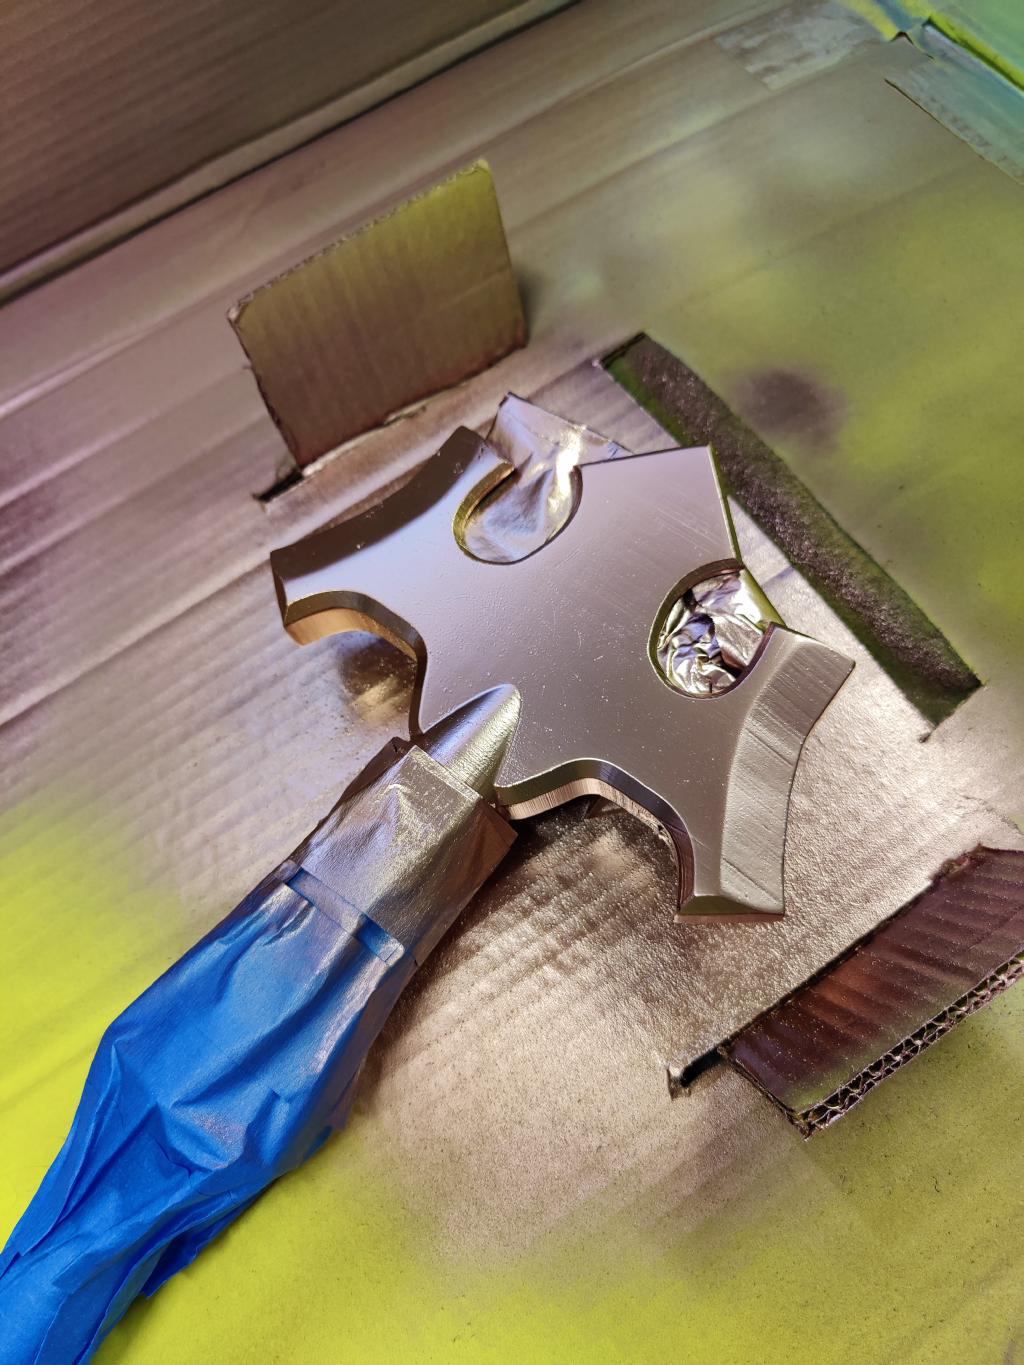
The Fusion 360 model was quite complex, consisting of 7 different components that fit together to form the complete handle assembly. These included the main grip, crossguard, pommel, and various decorative elements. All pieces were printed on my Prusa Mini+ 3D printer.
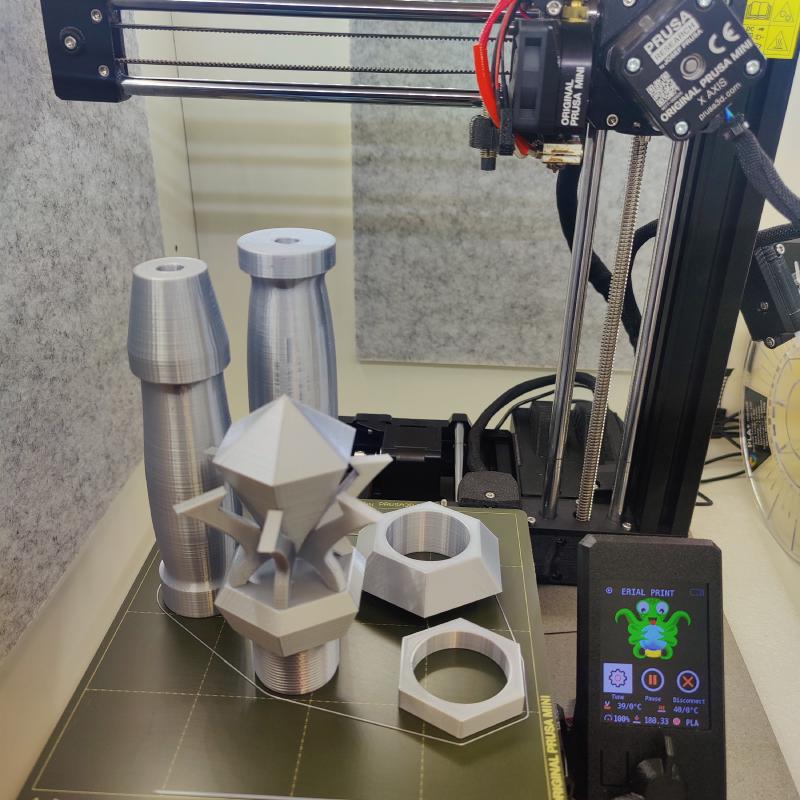
The printed parts came out beautifully, with details that would have been impossible to achieve with cardboard alone and with waaaaaaaay less manual effort. A better outcome and less manual work. What's not to like?
Handle Build and Finish#
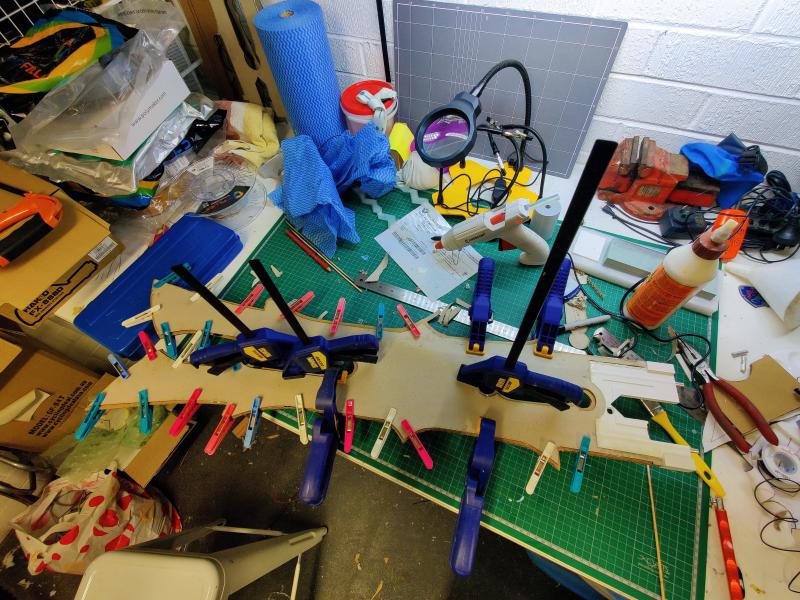
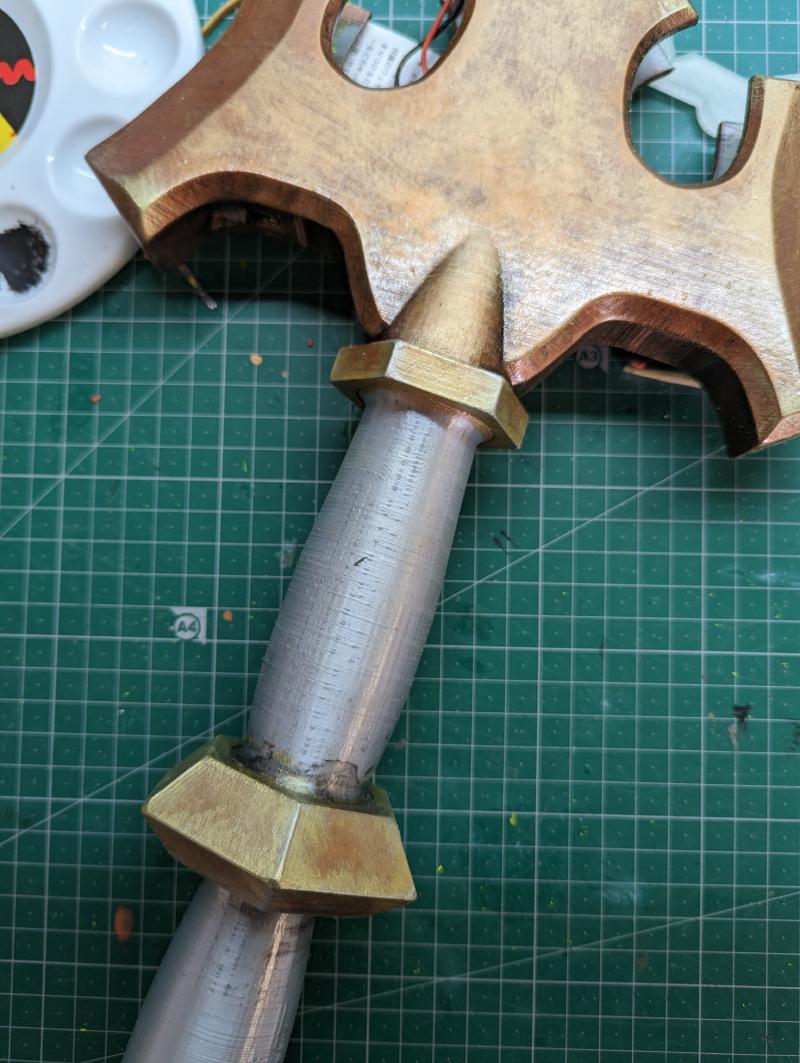
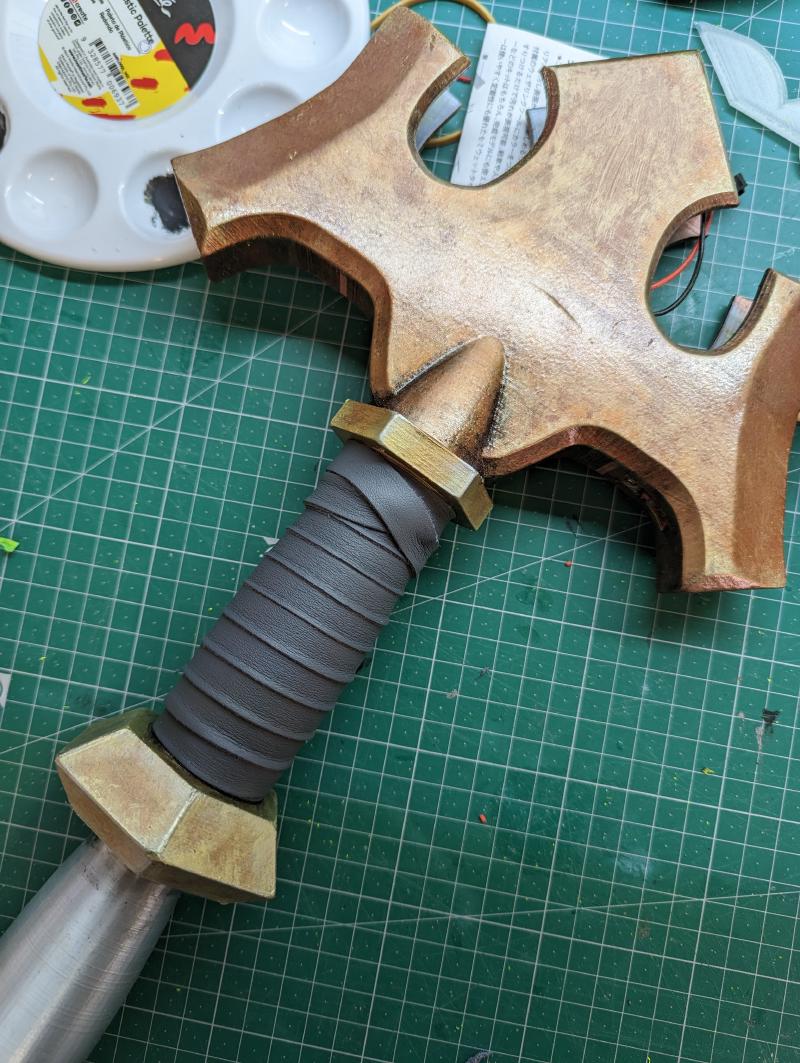
For the handle and crossguard section, it was a fairly simple process to assemble, glue together with Weld-On 16 (my go to adhesive for these projects). Given the weight of the blade I was concerned about leaving all the structural support to the 3D print, so (not shown) is the hollow aluminium pole down the centre of the handle.
With the structure in place as a finishing touch, I wrapped it with vinyl leather material. This not only looks great but also provides a realistic tactile feel when handling the sword. The texture and slight give of the vinyl leather creates a much more authentic grip than painted plastic or cardboard could achieve.
Bringing It All Together#
While the blade and handle were built separately to facilitate the electronics installation, they were permanently joined during final assembly. Built in two parts, the blade and handle sections were finished largely apart and then brought together for completion. More Weld-on 16 and it was largely done.
Painting#
After basic painting, I applied various aging and highlighting techniques to give the 3D printed components a metallic, weathered look that matched the slightly worn appearance of weapons in the game.
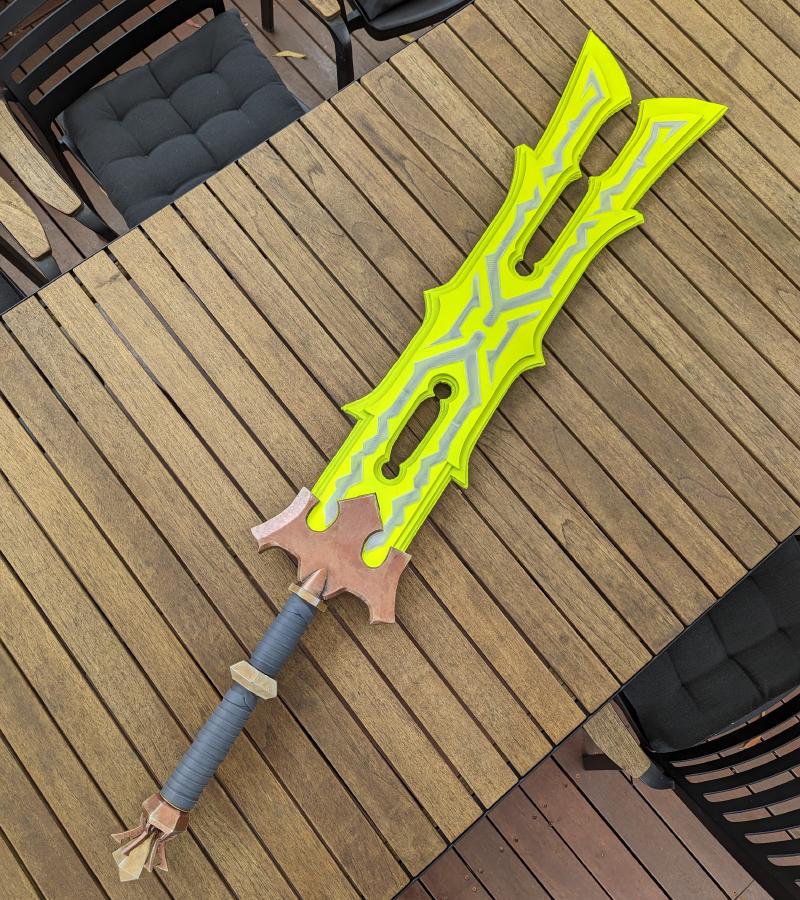
The most striking feature of the Great Thunderblade is its vibrant yellow-green blade with white lightning patterns. I used bright neon spray paint for the blade to achieve this eye-catching effect. The 3D printed hilt and pommel were painted in metallic copper/bronze tones to match the game design.
The Finished Great Thunderblade#
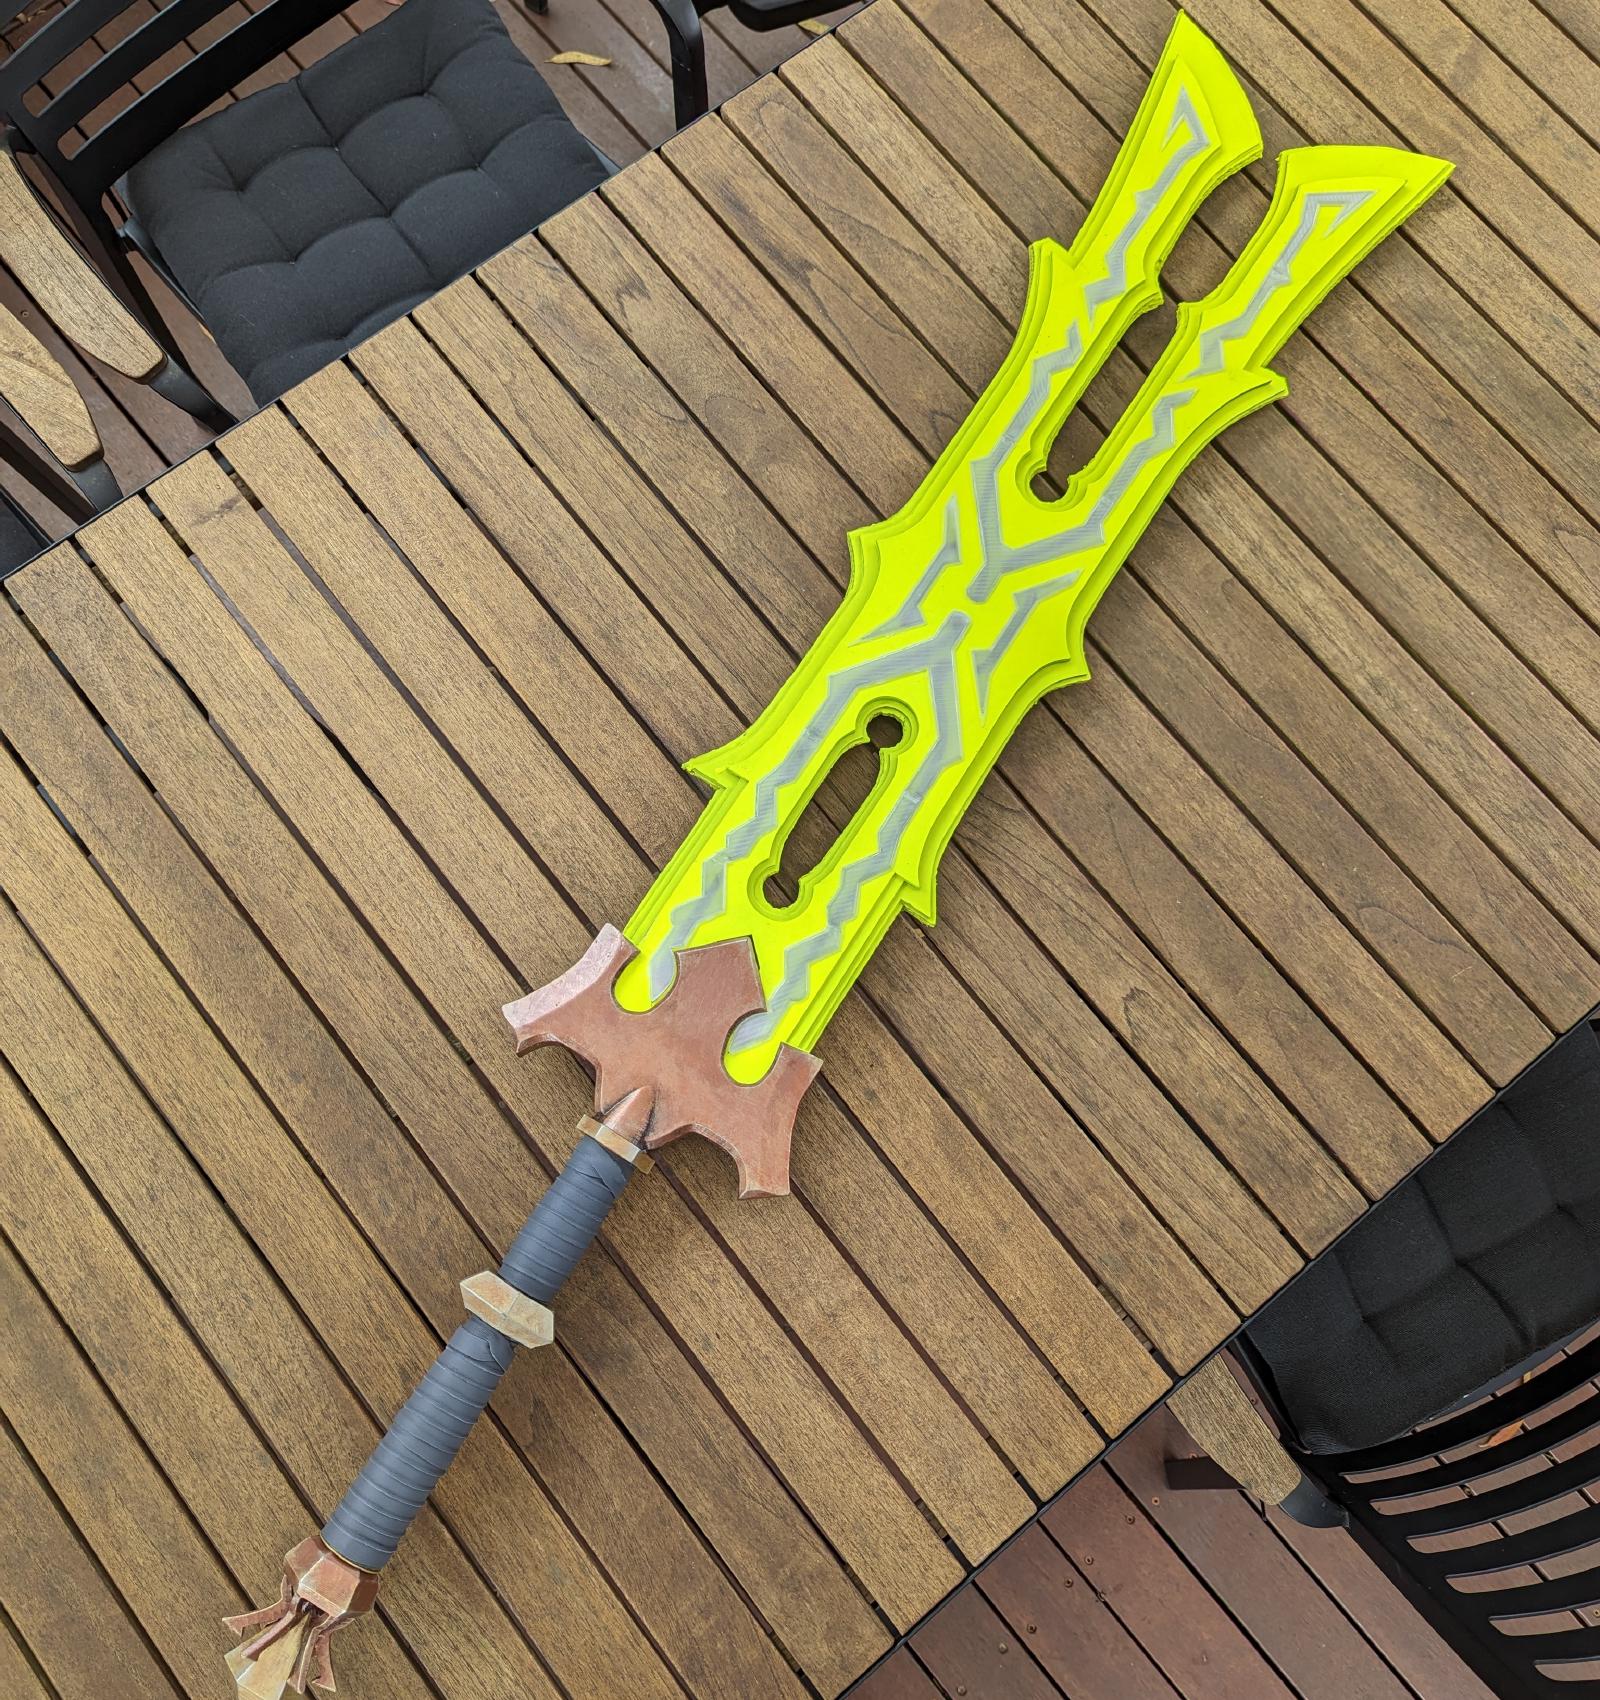
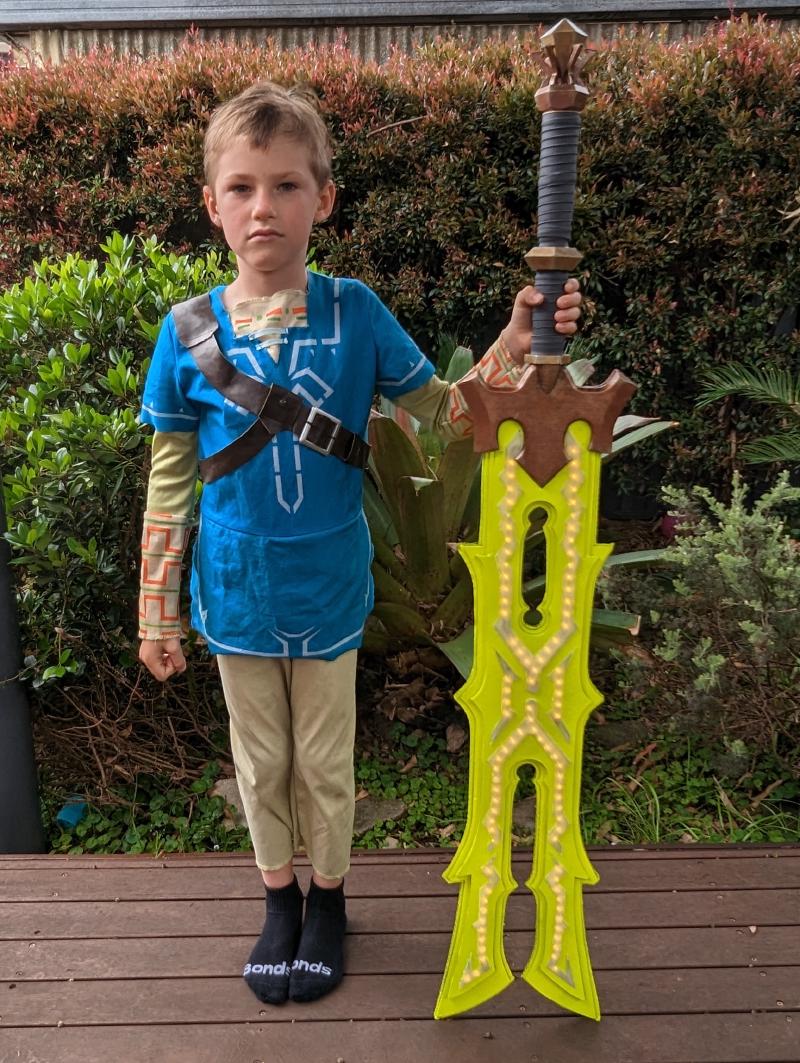
The completed Great Thunderblade stands at over 1.5 metres long, with a glowing lightning pattern that brings the elemental weapon to life (though you can see the LEDs a little too much for my liking - should have used white filament, not transparent). The combination of techniques used in this build represents a significant evolution from my earlier cardboard-only projects.
The dense cardboard I used for the blade made the inished sword is quite heavy - a bit too hefty for my younger son to wield safely. But, it sure does make a statement with it's size - which was taller than the little guy at the time of the build. Instead of the play item, it has found a place of honor displayed on his bedroom wall and is a huge talking point anytime he has a friend over.
Downloads#
For those interested in creating their own Great Thunderblade, I'm sharing the design files:
- Great Thunderblade Complete Template (PDF)
- Great Thunderblade Laser Cutting Files (PDF)
- Great Thunderblade 3D Printed Parts (STL)
Final Thoughts#
The Great Thunderblade represents a significant milestone in my prop-making journey, combining multiple techniques into one ambitious project. While certainly more complex than my earlier cardboard-only builds, the addition of laser cutting, 3D printing, and LED lighting opened up new possibilities that I'm excited to explore further in future projects.
For those following my Legend of Zelda weapon recreations, stay tuned for the upcoming Great Frostblade project, which will build on the techniques developed here.
Explore my other Legend of Zelda weapon recreations in the Swords-n-Stuff or the collection below.